
Introduction
Installation and Use
We installed CutOut 3 from a CD that we received in the office. From popping it into the tray to starting the program takes around 6-8 minutes or even longer if you thoroughly read the terms and conditions. Annoyingly, the most time taken is preventing toolbars and default home pages being amended. That kind of stuff is usually offered with Freeware as a way of keeping it free and to that end; it's tolerated. We certainly don't like to see it on a paid application. The worst bit is an advert asking to check your computer for out of date drivers. The only visible way of getting out of it is by clicking Continue. We closed the window which did the trick, but someone who's a newcomer to computers may not have the same nuance and download any of this stuff without realising what they're doing.So the program is off to a bad start because we're annoyed at the installation procedure. So to balance it out a bit, let's look at a few good points. CutOut 3 will work as either a stand-alone product or as a Photoshop plug-in. When installing you can opt to have a desktop icon installed, which we did.
Once CutOut 3 was opened, we were prompted to input the licence key to activate the product. After that was complete, we could select the plug-in folder in Program Files for Adobe Photoshop and the program installed the plug-in for us, which is pretty neat.
 Cutting Out
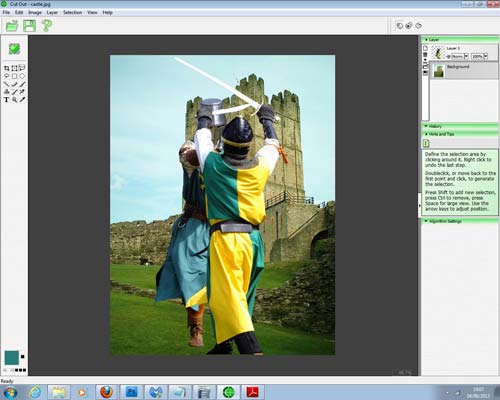 Placing on a Background
Once you've selected a file that you wish to cut out, you need to tell the program whether you're cutting out the foreground or the background before choosing the type of cutter. There are three to choose from: Blue screen matting (Chroma Keys), Inside/Outside matting or Batch Chromakey. Blue screen matting is used on simple, solid colour backgrounds, such as studio work. For more complex images, you would use the Inside/Outside matting option as you get to determine the outside and inside edge of the subject you're cutting out.
If any of this begins to get confusing, there's a large question mark at the top of the window which opens the Help guide. However, for the first time using the program, a Tips window opens and gives a comprehensive explanation of what you're doing.
 Inside Outside Matting
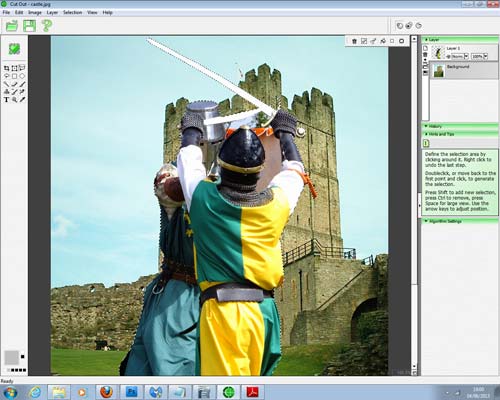
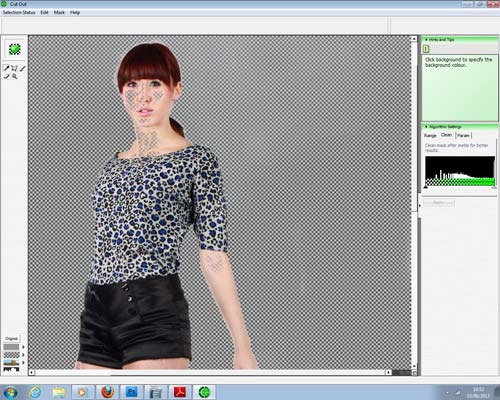
To cut out a subject and place it on a new background, there's a particular way of doing things and, despite the extensiveness, the guide misses stuff out. For example, the first step is to open the background before the subject you're cutting out. Now, to open the next image, you can't just go to Open and select your file as that will discard your current background. You have to choose the tiny folder icon down the left side of the layer pallet. Hovering your mouse over will tell you it's the tool for opening a new image as a layer. You then use a selection tool to outline the subject and choose Delete Inverse from the Selection menu.
If you have a solid, single colour background, choose the Blue screen matting which uses the same technology found in today's blue screen seen in feature films. Click on the pipette and then use it to select the colour you want to dispose of. The program will do it for you. There will be errors and CutOut knows this and tells you. To know how to get rid of them all, there's three algorithm settings you can use on the right of the picture. The best way to see any errors is by using the mask filter on the bottom left of the screen.
 Eraser Tool
Algorithm Settings are split into three sections: Range, Clean and Parameters. The Range will deduce how many pixels can be discarded due to their opacity and colour. The Clean section is great for removing single stray hairs as they normally have colour bleed over them. The Clean slider will adjust the tolerance of that colour to expand it or contract it.
If you have any hard edges with remains of the background, you can feather them by choosing Mask and checking Feather in the Parameters section of the Algorithm settings.
Once you've managed to work your way through the program and you've cut your picture out, you can look at placing it onto another image in CutOut 3 or you can save it as a .pds file to use in Photoshop.
 Selecting FlawsRemoving Flaws
So we know we can cut things out and put them on other things. But what about the other features in CutOut 3?
 Create Lens Blur
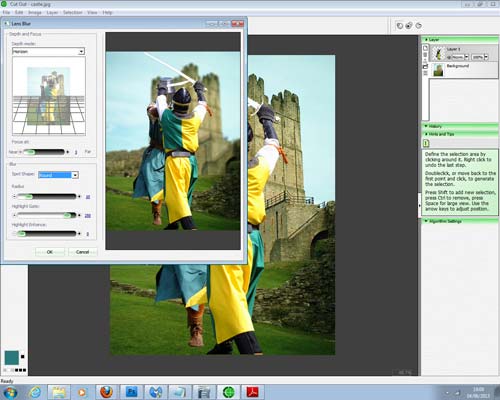
Well, you can create a depth of field on the pictures you're cutting out by using the useful Lens blur tool in the Image tab. After selecting the subject and creating a new layer, choose Lens Blur from the drop tab at the top. You can choose the blur type such as plane (flat backgrounds with no perspective control needed), tunnel or horizon, you can adjust the plane that the focus sits on and adjust the focused area. It's all very intelligent and looks great when done properly.
 Inpaintin Tool
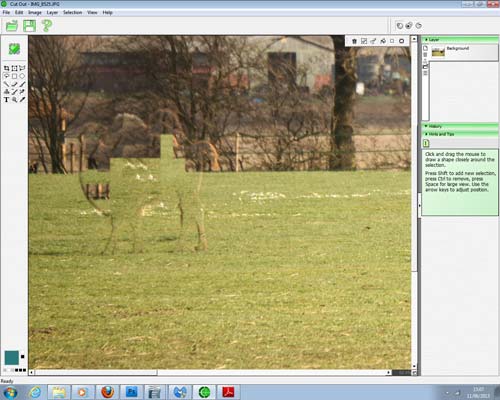 Inpainting Tool
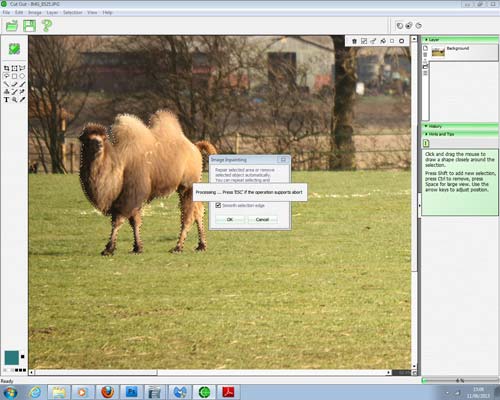
You can also remove unwanted people or objects from pictures by using the Inpaint tool. It's found in the Selection tab and once you've selected the subject, choose Inpaint and the program will cut it out for you. Our test image was a little difficult, we wanted to see if it could cope with complex detailed backgrounds. It struggles and on a second attempt, we'll encapsulate more of the camel in the selection, but it would be easier to tidy up using the clone tool in Photoshop by using the groundwork from CutOut.
Performance
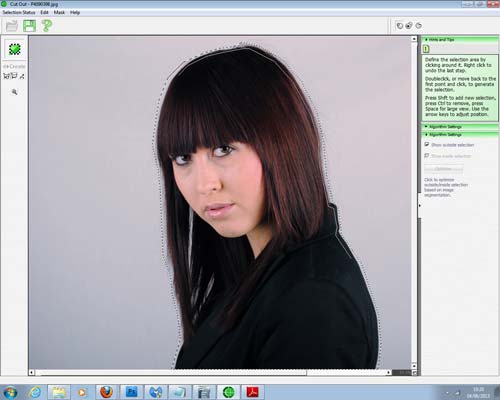
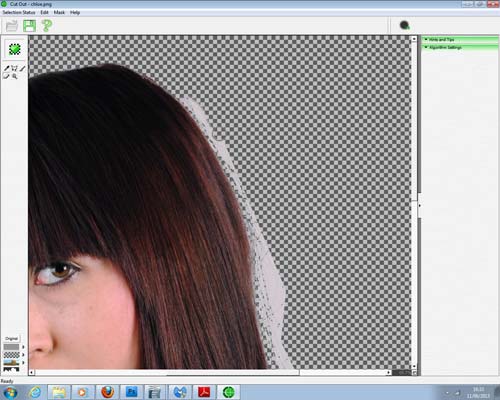
Using the selection tools is a painstaking ordeal if you have a large image with lots of detail. There's also a lot of room for error. You see you should be able to double-click the tool and it will join with the start point, but all too often we would spend 10-15 minutes finely cutting out a subject, double click and the selection would disappear. The tutorial displays an easy cut-out of a sparrow. It also shows that you don't have to be precise, but it depends on how particular you are about having the background effect bleed over.Cutting out fine details, such as hair, isn't easy. In fact, we found it nigh on impossible. Looking closer, the program doesn't consider hair as an important feature to retain in the cut out. We're inclined to agree as a general rule of thumb, but all too often when hair has been cut out, it looks cut out because there's no natural fly away hair. There are other cut out tools such as Vertus Fluid Mask or Xara Photo & Graphic Designer that have much better masking features for hair. They're more powerful and more intelligent, being easier to use.
The blue screen matting procedure is arguably the easiest mask tool to use, but it's limited to flat, single colour backgrounds. Great for studio work, but it has a degree of error where it will retain the colour on the edges. The algorithm settings need to be fiddled with to get rid as well as the feathering. We found it worked on large areas, such as body parts, but not on finer areas, such as hair.
Conclusion
CutOut 3 has produced mixed feelings from us. When the program is used correctly, it's very good, but with it being set up mainly for newcomers to masking – over established hands – it seems that there's a lot to do. The masking can be long winded and painful, especially when it goes wrong, leading to a loss of patience and that's where the program could fail. 99% of any computer error is down to the user and it's never been more relevant than with CutOut 3, but try telling that to someone who's just spent ages masking off a subject on a large image file only to lose the selection because the tool hasn't connected the start and end points.The algorithm settings aren't very easy to work out from the beginning. The program needs a lot of reading up on before you start using it, which in itself shouldn't be a bad thing, but when the majority of other programs available can be used straight out of the box, it reflects bad on ones that need to be researched first.
We got some great images from CutOut 3 and with time and exposure to the features, they'll become easier and easier to use. Straight out of the bag, it can get quite confusing and tedious, so keep plugging away at it to see the best results.
Nessun commento:
Posta un commento