
Cyberlink PhotoDirector is a stand alone photographic work flow tool designed to make editing and storing pictures a lot easier. Using powerful tools such as native RAW conversion for Canon and Nikon cameras, regional adjustments and non-destructive editing, PhotoDirector should be able to speed up your time sat in front of a computer to allow more time to get out and take pictures. After all, that's what photography is all about. Cyberlink PhotoDirector costs around £80 / $100 for the 2011 edition.
PhotoDirector is available for download from the Cyberlink website and is very easy to do. It's also available as a free trial so you can see if it works for you before you commit.
We downloaded the program from the website which took us around ten minutes with a half meg broadband connection. Installation only takes a few minutes and at this stage, Cyberlink will recommend to sign up to their newsletter to get special offers. This can be changed in your profile which is created when you register so don't worry if you say yes or no and then change your mind.

Photo Import
Starting out with the program is easy enough. Guide boxes will pop up to give an indication of what needs to be done next. Importing pictures can be done by going to file and selecting Import. You then get to choose if you want to import individual photos, an entire folder or directly from a camera. Alternatively, you can use the dedicated import button in the bottom left corner. An important point to note here is that when the window opens to navigate to the folder the pictures are in, the bottom right corner has a drop down box with file formats listed in it. This is defaulted to JPEG, meaning that any TIFF or RAW files won't show. Changing this to All files will show them all. Why a program promoting professional image conversion defaults JPEGs is unclear and it's certainly annoying because it always defaults to JPEG with no clear way of setting it to anything else permanently.
The program is compliant with all Canon and Nikon RAW file types because Cyberlink have licensed the SDK (Software Development Kit) from them. However when we downloaded a series of pictures into the program that were taken on a Canon EOS 60D, PhotoDirector flagged up an error message saying: "Cyberlink PhotoDirector is unable to decode the master". We contacted Cyberlink who were very fast at replying and correctly identified that the computer we were using hadn't had the latest driver updates for the graphics and sound card. A quick visit to the computer manufacturer's website fixed the issue and we could download the pictures properly after rebooting. We brought in around 60 pictures and it only took a couple of minutes which is good considering they're approximately over 20Mb each. This is because the pictures are shown in a minimal quality to speed up the processor but if you have the time, you can click on the cog (Preferences) at the top of the page, go to File Handling and change the preview quality there.

Library
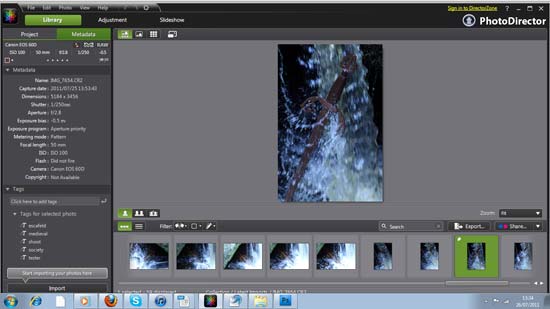
The program is split into 3 main parts: Library, Adjustment and Slideshow. The layout of the Library runs along a similar vein to Phase One's Capture Pro with the menus and options down the left side of the main viewing panel which is in itself split into two tabs: Project and Metadata. The Project tab is where the pictures are graded using a star rating system and you can also add keywords and create albums to place the pictures in. The initial work to do this will make it a lot easier to find them in the future. The Metadata tab simply shows the EXIF information of the picture that's highlighted in the preview window.
Cyberlink's PhotoDirector is also reminiscent of Corel's Paint Shop Pro with the thumbnail gallery towards the bottom although this can be changed to a list view if you prefer. This layout can be chopped and changed by clicking one of the three icons in the top left corner of the preview window. There's the option to remove the thumbnail gallery or remove the preview window. Next to this is a full screen option which removes everything. Pictures in the thumbnail section can be filtered using the 3 filters available. They can be flagged as selected or rejected, coloured labels can be added and you can also show pictures that have been adjusted or ones that haven't.

Flagged Image
Metadata
Pictures you've changed or finished with can be automatically uploaded to Flickr or Facebook using the Share button. This is a very popular thing to do these days and it's not just limited to young people.
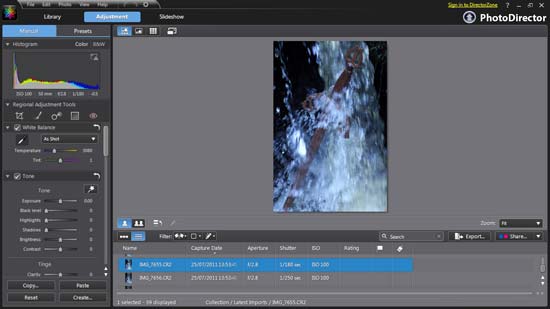
After sorting the pictures, you can click over to the next part of the program to edit them. It's obviously not as extensive as a full photo editing system but there's plenty to do all the same. A histogram allows you to keep a track of the exposure while you make adjustments. There are 7 options: Regional Adjustment Tools, White Balance, Tone, Level, HSL/Colour, Detail and Vignette. This is similar to the adjustments available in Lightroom from Adobe. There are only 5 Regional Adjustment Tools which seems minimal at first but drilling down into each one opens up a lot more. Take, for example, the Adjustment Brush. The brush will adjust everything from exposure to contrast, saturation and colour. First the strength has to be selected using the slider system before placing the brush on the picture. The size of the brush can be adjusted at the top as well. Along the sliders are the values of the adjustment you make. These can be changed using the small up and down arrows but they don't always change in individual movements. Most do but there are a few rogues such as the Exposure slider in the Mask tab. If that's a problem and you'd like a more precise adjustment, double clicking the values will allow you to type in the number you want.
 Adjustment
Adjustment - Exposure Mask
We found the brushes and especially the clone tool more difficult to use than the tools in Adobe Photoshop and this could possibly be because we're more used to the latter. The clone tool has the preview that CS4 has, which is handy and the more we used it, the more we liked the linking of the arrow to show which spot was coming from where. However, if the picture has a lot of these, they all remain in view and it can get cluttered. Places that have been adjusted can be highlighted by clicking on the small red button which will show the area adjusted in red. This colour can be changed in the tools on the left if need be.
There's no obvious history panel to go back if an error has been made but it's opened up by pressing the icon in the bottom left corner of the preview window next to the pencil. One thing about the history is that it shows all history. Photoshop will lose actions the more adjustments you make but PhotoEditor retains them.
We took our test pictures on a false white balance setting to see how the program coped with changing it and it has to be said that it's done a great job.
If you don't want the hassle of changing all your pictures manually, there's a Presets tab which has 24 preloaded filter effects for your pictures. There's also a direct link at the bottom to download more. Here's the great bit though: A small preview picture at the top will change to show the preset adjustment without having to click any buttons or confirm anything. This means you can get an idea for how the picture will look without having to actually apply it then erase it if it's not right. If this is all you're going to use the program for, there are other programs such as OptikVerve's VirtualPhotographer which is a free plug -in and features very similar filter effects.
Slideshow
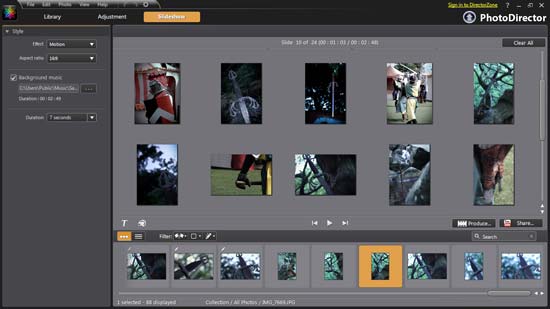
Finally, the Slideshow tab allows you to make a basic slideshow out of the pictures that you've imported and adjusted. The pictures are chosen by either dragging them into the preview screen one at a time or by holding the Control key (PC) down and highlighting all the pictures you want to use.
You can amend the type of wipe used out of a selection of 3. We liked the motion option because it moves along the pictures slightly adding a dynamic slant. Also, we considered the fade to have too sharp a drop off.
You can also choose between 16:9 and 4:3 aspect ratios. If you want to add music, you have to import it from your computer and there's a handy timer telling you how long the song lasts. That way, you can space the slideshow to fit it either by adding/taking pictures or by changing the duration of tiles on the slideshow. A good average is 4-5 seconds but in our example, they're 8 seconds. We would like to see the ability to change the duration on individual tiles for introductions and credits which can be faster. Also, it would be nice to be able to overlap the tiles to create more professional looking text at the start but this isn't a slideshow program and there are more powerful programs available such as Photodex Proshow. We couldn't convert a video to the default MP4 option, we had to select WMV. The default size provides a very low resolution result so we had to manually change it to a HD 1280x720 version.
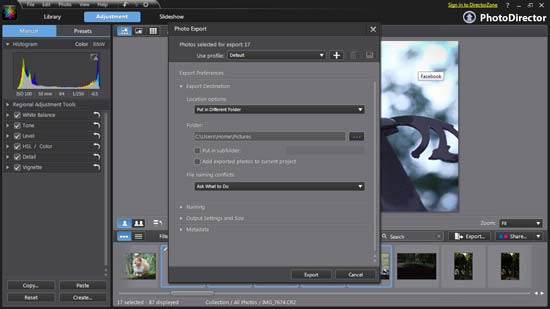
Photo Export
Once you've done editing and creating slideshows, you can export the pictures. Clicking the export button will move them into a folder on the hard-drive or an external drive depending on what you designate. The program will default a folder but it's easy to change it. You can retain or strip EXIF data if you wish as well as tagging data and copyrights. We transferred 17 pictures, all except four being RAW files and this took around 5 minute. The system will compress them to JPEG unless they're already JPEG and nothing was changed in PhotoDirector. It's a shame that the program mentions copyright but doesn't allow it to be added. It's not difficult to do anyway, it would just make life a bit easier.
Conclusion
Cyberlink PhotoDirector is a good program to use. The more we used it the more it took on the appearance of Adobe Lightroom. It does a good job of emulating it but don't expect all the features of Lightroom. After a shaky start which looked like our fault having out of date drivers, we flew through the program because everything is easy enough to use. We think that the adjustments area could be a bit more precise though. While we used it, we felt like we were adding effects clumsily. For example, the sharpness doesn't appear to make any changes then it jumps right in there and over sharpens.However, for basic editing the adjustments area does well enough. Cyberlink PhotoDirector's best side is the Library. It's possible to import, tag and store pictures without too much fuss and the worst part of digital photography is the amount of hours sat behind a computer converting pictures. It's a shame that batch processing isn't available in PhotoDirector because that would be the cherry on the cake. We had around 60 RAW files that all needed the same key words and it would be great to add those words as a batch. Maybe that's something for the future?
The Cyberlink product support team are also very fast. They're based in Europe and deal with the entire continent but we had a response to our problem in 24 hours. If you're on the look out for a key word tagging system that has basic editing and a slideshow option thrown in, then it's worth taking a look at PhotoDirector because at £80 / $100, it's a lot cheaper than Lightroom and most importantly also does a good job.
Nessun commento:
Posta un commento